Wednesday, February 20, 2013

Taking care of business...

Three years.  That's how long ago I changed all our homes fixtures (door knobs, hinges, etc.) from bossy brass to serene satin nickel.  Don't you feel like the color brass is shouting at you, "Hey, look at me??!"  So as I replaced the last door knob on the closet door of the master bedroom, I threw myself back on our bed and...proceeded to have the light fixture shout at me. In a rather obnoxious tone, "na-na-na-na-na-na".

Shit.

I walked around to all three bedrooms and there they were, Brass Light Fixtures.  Sneaky like brasstards.  And I vowed to fix them...tomorrow.  'cause damn it, I was tired. 

That was three years ago.  Last night I researched how to repaint my kitchen cabinets, because that, my friends, is happening.  But as I was making my notes and sketches, I heard this little voice in my head (sounding mysteriously like my husband's) reminding me of all the half-finished projects I have yet to do.  You see, my name is Annie and I am a half-asser. As in I don't finish all my projects. As in I'm addicted to starting new things.  As in, I find inspiration, I run with it, I am in clear view of the finish line...and I swerve to the left to follow that little side-trail that suddenly caught my attention.  My husband thinks I have adult ADD, but I think I'm addicted to feeling inspired.  Makes me sound more artsy & mysterious, you know?

So, making my husband happy really is at the top of my priorities, so I dutifully wrote out my list:

I vow to finish these projects before beginning on a new one. 

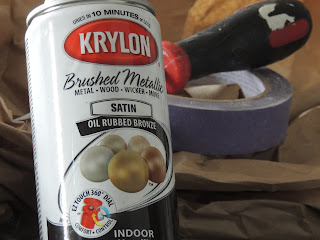
I don't know about you, but when I'm crossing things off my list, I go easiest first.  Light fixtures it was.  Except, I used the last of my satin nickel plate on..something.  Can't remember what, but I assure you it was really important (and hopefully finished). (And I know it wasn't the bathroom fixtures because something in me told me that no matter what Pinterest said was possible, painting my bathroom fixtures with spray paint really wasn't in my best interest.)

At any rate, I was out of Satin Nickel spraypaint, but I had leftover oil-rubbed-bronzed, which would probably look better anyway. Here's what I needed:


 If you're looking for a tutorial, there really isn't much to say. As it turned out, my light globes were in dire need of cleaning, so I removed them and let them soak over in the bathroom. I loosened the two screws attaching the fixture to the ceiling just enough so that I could slip a sheet of paper underneath.  I protected my ceiling with some of that paper that Amazon packs generously in it's packages, and some left over painters tape.  Then I lightly gave each fixture 3 coats of paint, allowing about 20 minutes of drying time between each.


 Since these aren't items that will be handled/touched, I was okay with not allowing a ton of time for drying between coats. Lesson learned, make sure your paper is secure. In the second after picture, you can see I got a bit of spraypaint on the ceiling.  A bit of rubbing alcohol on a rag took this right off, (whew!).  So, here are the before and afters:


What do you think?  Am I weird for getting caught up on all these little details? I don't know about you, but I feel like we purchased a house and these little details are what continues to make it feel like our home.  What's the little detail that bothers you in your home?

Monday, February 11, 2013

Fabric covered storage boxes for Expedit (IKEA)

My treadmill is in the basement family room. Not that I do it religiously, but when I am down there running, my focus becomes the mess that has accumulated in my Expedit bookcases from IKEA. I have a love/hate relationship with these bookcases. I love, love, love these shelves because they are so versatile and can hold so much...and I hate these Expedits because they can look messy while holding everything.


 So a few weeks ago, I started shopping around for containers. The only containers I found were the red ones pictured here:

 
But at $9.99 a piece (with a 50% off coupon), I really couldn't afford buy 16 of these babies.  Also, I wasn't completely in love with their height.  I really was looking for something to take up each individual square space.
 
So, when I was creating my headband organizers, I noticed that the material was a perfect match for my basement family room:


Seriously, I don't think I could find a better match if I wanted too (the fabric is more red than orange the way the photo appears).
 
Having this material in hand reminded me of some tutorials I've seen on Pinterest.  Like this one...this one...oh, and this one.
 
I wanted 12 boxes.  The amount of fabric I had leftover was enough to cover about 8 boxes, the front only.  Office Max had the boxes on sale but one get one 50% off.  $18 later, a warmed up glue gun and a container of modge podge, I was ready to go...
 
First off, these boxes are super simple to put together.  I had all 8 boxes together in about 15 minutes.
 
 
The first thing I noticed was the way the handles had a tendency to be kind of loose: 


So I hot glued those so that they would lay flat:  
 
 
I spread the fabric out on my kitchen table, and set about cutting a rectangular piece of material that would fit on the end of the box and hang over the side about 1/2" - 1". Using a 2" paintbrush, I spread Mod Podge over the surface, centered my fabric over top, and firmly pressed it down, streching and smoothing it.  I used my glue gun to adhere the edges of the fabric securely to the cardboard.  Then using my scissors, I cut through the existing handle hole so that I could wrap my fabric through it:
 

One finished box with Mod Podge still drying:

  
And the Final Reveal:
 
BEFORE


AFTER


BEFORE
 
AFTER

Overall, I'm really pleased with how they turned out.  One of my next projects will be to take care of those pictures that are in the "After" photo of bookcase #1.  I'm happy about leaving the empty top middle shelves, but not with how cluttered those pictures look in there.  I think I'd like to put all those pictures in matching frames and putting them on a shelf.  Maybe a shelf behind the couch/under the mirror?


What do you think? How have you solved your unmatching picture frame situations?

I hope that helps or inspires you to sole your Expedit or other storage dilemna!! 
As for me, I'm going to go hit the treadmill :)


Monday, February 4, 2013

Bathroom re-do under $250


Really there wasn't anything wrong with that small little bathroom off the side of the kitchen. My large bathroom upstairs is the one I want to really remodel....starting with painting the double sink cabinet. Pinterest says painting the cabinet is possible, but I really didn't know if it was within my reach. So I thought I would 'test drive' cabinet painting on my downstairs bathroom. And that is where it all began. I started with this:


Before

Before
Fixtures before
The first thing I did was to sand the cabinets.  I removed the hardware and doors for this step.  Then I gave the cabinets two good coats of primer.  I waited a day between each coat.  Then I got to painting them.  The best part is that up until this step, I have spent $0.  The primer and paint were both found in the garage, leftover from past projects.  I'm not sure if it was because the paint was old, or if it's just the type of paint I used, but I had to use 4 coats of paint (using a mini roller and brush for crevices) to cover the primer.  While waiting between coats, I found other things to keep me occupied....like painting my chrome (I HATE chrome) fixtures with oil rubbed bronze spray paint.  I painted the toilet paper holder, towel holder, and light fixture above the sink.  The only prep I did prior to painting these items was thoroughly washing and drying them.  Technically I think I was supposed to sand and probably prime before painting, but I rationalize that the things I was painting get very little direct contact.  Now that my cabinets were painted, put back together and looking spectacular, I couldn't stop looking at that ugly mirror.  Off to Lowe's I went, and came out with two sheets of 2X2 tiles.  Once home, I took the tiles off the backing, and using clear silicone, affixed the tiles to the outside of the mirror.  Price so far, $4 for spray paint, and $14 for the tile.  $18 total.  I really should have been thrilled with it and let it go...but then...I decided to replace the sink.  You can see from the before picture that the sink is really tiny and has no counter space.  Back to Lowe's I went, and picked up a piece of aspen wood.  Once home, I removed the sink and cut the Aspen wood to fit on top of the existing vanity and extend to the wall on either side.  Using scraps of wood and trim, I added tiny shelves on either side of the vanity under the countertop, allowing enough room to store toilet paper. Lastly, I installed a new vessel sink and faucet.


AFTER


BEFORE


Material Costs:
Spray paint $4
Tile $14
Countertop $18
Vessel Sink: $80
Faucet: $89
New Towels: $18
Total cost: $223

Organize your headbands in under 30 minutes.

The bathroom closet makeover really was the project that keeps on giving.  For the most part, it has stayed organized, making that one less area of our home that requires constant attention. The one exception has been the headbands that seem to accumulate in the closet and just create a chaotic, unsightly mess.  I put a basket in there as a 'catchall' to help keep them contained, but it was really ugly to open up the closet and look down to see that mess. 


Some time ago I saw a post that used old oatmeal containers that were decorated and you could then wrap headbands around them, but this really didn't serve my purposes for two reasons.  One, we get our oatmeal from Costco, so we don't end up with any of those nifty containers.  And two, I really wanted to get these headbands up off the closet 'ledge' and suspended in some fashion.  I brainstormed a bit, thinking about items that I might have lying around the house that were the same general size as the oatmeal containers and kept coming up with really large pvc pipe, but that just didn't appeal to me.  A few days later, while cleaning the bathroom mirror, the paper towel roll in my hand solved my dilemna. Grabbing two brand new rolls of paper towels, I ventured into my craft room to see what type of leftover material I had available to cover these babies up. Bingo! As luck would have it, I had great spare material (which inspired me to do another project I've been thinking about--more on that later), so I gathered my materials:


I eyeballed the material and ribbon for this, so I don't have any measurements for you...Here was my general method:

1. glue edge of material onto paper towel roll, wrap material around the paper towels tootsie roll style, and glue edge to finish.
2. using a long ruler or something similar, push ribbon through the cardboard tube.
3. push loose ends of material into the ends of the cardboard tube.
4. tie off ribbon.
5. hang
6. place headbands on holder.

I needed two rolls for my closet and used a over the door hook to hang my rolls. Here's the finished project:


Overall, I'm pleased with how it turned out and THRILLED that it took less than 30 minutes of my time!!!